Four simple tests to check your leg strength for running – And how to fix what you find
- Maryke Louw

- 18 hours ago
- 10 min read
Updated: 2 hours ago
Discover four easy tests you can do at home to check whether your legs are strong enough for running. These are the same tests we use in our clinic when creating bespoke injury prevention plans for our patients, and they can quickly highlight areas that might benefit from a bit of extra work. I also share the best exercises to help you improve.
Remember, if you need help with an injury, you're welcome to consult one of our physios online via video call.

Some of the links in this article are to pages where you can buy products discussed or mentioned here. We might earn a small commission on sales at no extra cost to you.
In this article:
In this article, I'm focusing on the legs only – let me know if you'd like some tests for core strength and control too.
I chose these four tests (there are plenty of others out there) because they're easy and safe to do at home and you don't need any special equipment.
👉 A quick note: The repetition numbers I suggest as "good" are based on general expert opinion and my own clinical experience. There isn't enough research on large groups of runners to give us exact benchmarks just yet.
Right, let's start with an easy one.
Test 1 – Static balance (position sense)
Why we're doing this test
Position sense – or proprioception, as it's known in the medical world – is your brain's ability to know exactly where every part of your body is and how it's moving, without you having to look at it. It's what allows you to run up the stairs without staring at your feet.
Your position sense relies on information from your eyes, ears, and tiny sensors in your joints, muscles, and tendons. If it's not working as well as it could, it can make you a bit more vulnerable to strains or sprains.
This series of balance tests checks how well the different parts of your position sense system work – especially when you take one or more of them away.

How to do the test(s)
I like to progress through three stages, starting with the easiest version and only moving on if you pass comfortably on both legs.
👍 Video yourself from the front so you can assess it properly afterwards, and do all three tests barefoot.
Stage 1 – Balance on one leg while focusing on a single spot ahead
This is the easiest version because you can use your eyes, ears, and sensors all together without any distractions.

Stand with your feet hip-width apart and gently engage your core muscles, then shift your weight over to one side.
Lift your other foot backwards off the floor, keeping your pelvis level.
Balance on one leg.
Try to keep your foot as still as possible – don't let it roll in or out.
Aim to hold this for 30 seconds while you watch yourself in a mirror or film yourself.
Switch legs and repeat.
Stage 2 – Balance on one leg while turning your head
Turning your head makes it harder for your brain to use the information from your eyes and ears, so it's forced to rely more on the sensors in your body.

Follow the steps above to balance on one leg.
Now slowly turn your head from side to side.
Do this for 30 seconds.
Switch legs and repeat.
Stage 3 – Balance on one leg with your eyes closed
Closing your eyes means your brain loses a really important source of information – and you'll probably find that the rest of your system struggles to make up for it!
Stand close to something sturdy that you can grab if you lose your balance.
Follow the steps above to balance on one leg.
Now close your eyes.
If you lose your balance, open your eyes right away and steady yourself.
Do this for 30 seconds.
Switch legs and repeat.
How to interpret your results
To get full marks, you should see the following when you review your video:
Your pelvis stays level as you lift your other leg off the floor – if it drops, it usually points to weak glute (buttock) muscles.

You shift equally over your supporting leg on both sides – if you shift noticeably more to one side, that can also indicate weak glutes.
Your foot and ankle stay stable – they don't roll in or out as you balance. If they do, it suggests your ankle and foot muscles could do with some strengthening.
You can hold your balance for 30 seconds without having to grab something, put your other foot down, or wave your arms around.
How to improve it
You can absolutely use these same balance movements as exercises to improve (try 3 x 30 seconds on each leg per session), but you might also benefit from:
Strengthening your glutes – especially the glute med (a muscle on the side of your hip) – if your pelvis dropped or you shifted more to one side. Bridges and clams are handy for this.
Strengthening your foot and ankle muscles if you struggled to keep your foot from rolling in. Do these exercises to correct overpronation.
Test 2 – Calf raise endurance
Why we're doing this test
Your calf muscles and Achilles tendons (the thick tendons at the back of your ankles) form a powerful system that propels you forward as you run and absorbs a lot of the impact.

If your calves aren't strong enough or they tire more quickly than the rest of your body, other areas – like your knees – may end up taking extra strain and get injured. Weak calves can also make you more prone to conditions like Achilles tendinopathy (an overuse injury of the Achilles tendon).
How to do the test

Wear shoes to protect the front of your foot.
Stand on a step or a thick book with your heels free to hang over the edge.
Hold on to something stable for balance.
Lift one foot off the step so you're standing on one leg only.
Keep your supporting knee straight throughout.
Rise up onto your toes.
Then slowly lower down until your heel drops below the edge of the step.
Immediately rise back up – don't hang at the bottom.
Continue at a steady, controlled pace (counting as you go) until you start losing form or can't lift all the way up – don't count any half-hearted efforts!
Rest for at least 1 minute, then test the other side.
How to interpret your results
It's normal for one leg to be slightly stronger than the other, but ideally the difference shouldn't be more than one or two repetitions.
Fewer than 15 repetitions – needs work
More than 20 – fair
More than 25 – good ✅
How to improve it
You can use the calf raise exercise itself to build strength. Aim for twice a week, with at least 2 days between sessions to allow proper recovery.
If you managed fewer than 15: Start with single-leg calf raises using just your bodyweight. Build up gradually until you can do 3 sets of 15, resting at least 1 minute between sets.
If you managed more than 15: Try adding a bit of extra weight to your calf raises – pick a weight that makes you feel tired after about 10 repetitions. Do 3 sets of 10, resting at least 1 minute between sets. Gradually increase the weight as you get stronger.
💡 Feel free to mix things up – try different types of calf raises, like doing them with your knees bent versus straight, or at different speeds. As long as your calves feel properly tired by the end of each set, they'll benefit and grow stronger.
👉 Looking for a structured way to build your running strength?
For the past 5 years, I’ve been working with the Exakt Running team to create an app for runners that makes it easy to stay strong and injury-free. You can pick from general full-body workouts or ones that target specific areas like your hips, knees, or ankles. There are 5 levels to choose from, so it's easy to start at the right level for you, and the exercises rotate to keep things fresh.
You can download the Exakt Running app from the App Store or Google Play and try it for free. If you decide to subscribe, use the code MARYKE for a discount. 💫

Test 3 – Single-leg sit-to-stand
Why we're doing this test
This test challenges your position sense in a pattern that's quite similar to the running action. It also checks the strength and endurance of your quadriceps (front of your thigh), hamstrings (back of your thigh), and glute (buttock) muscles.
💡 If you tend to get achy knees when you run, this test is especially relevant. The stronger your quads are, the more force they can absorb – which means less strain going through your knee joints.
How to do the test

Find a chair you can stand up from using only one leg. It should allow your knees to bend to about 90 degrees when you're sitting.
If you struggle to get up from a standard chair, use a higher surface or put some cushions on the seat to make it easier – it should feel challenging, but you should be able to manage at least 3 repetitions.
Sit on the edge of the chair with one foot on the floor and the other off.
Keep your hands at your sides or out in front of you.
From sitting, slowly stand up using only one leg.
Keep your pelvis level and your knee in line with the middle of your foot as you move.
Slowly sit back down again.
Focus on control – avoid using momentum or plonking down onto the chair.
Count how many you can do before your control starts to go or you get tired.
Rest for at least 1 minute, then test the other leg.
How to interpret your results
Again, it's normal for one leg to be slightly stronger, but the difference shouldn't be more than one or two repetitions.
Fewer than 10 repetitions (or unable to do it from a regular dining chair height) – needs work
More than 15 – fair
More than 20 – good ✅
If you notice:
Your knee turning inwards a lot – this might mean your glutes (especially the glute med) need some strengthening (see below).
Your foot and ankle rolling inwards – you might need to work on foot and ankle strength too.
👉 That said, sometimes it's the leg turning in that forces the ankle to follow. So, if you notice both, I'd usually focus on improving hip control (glute strength) first.
How to improve it

Exercises like clams can help you learn how to use your glutes to control rotation at the hip, while also strengthening the glute med. But research has shown that all the gluteal muscles contribute to hip stability, so any exercise that works them is helpful – including bridges, squats, and deadlifts.
Squats (usually with added weight) are great for building general strength and teaching you a good movement pattern.
If your control was good but you simply couldn't manage enough repetitions, use the test movement itself as an exercise – it's essentially a single-leg box squat.
These all fall under strength training, so it's usually best to leave at least 2 days for recovery between sessions.
Test 4 – Single-leg high bridge
Why we're doing this test
Sports teams often include this test as part of their preseason screening to assess players' risk of hamstring strains. It requires your back, glute, and hamstring muscles to work together, and it quickly shows up if one area is weaker than the rest.
How to do the test
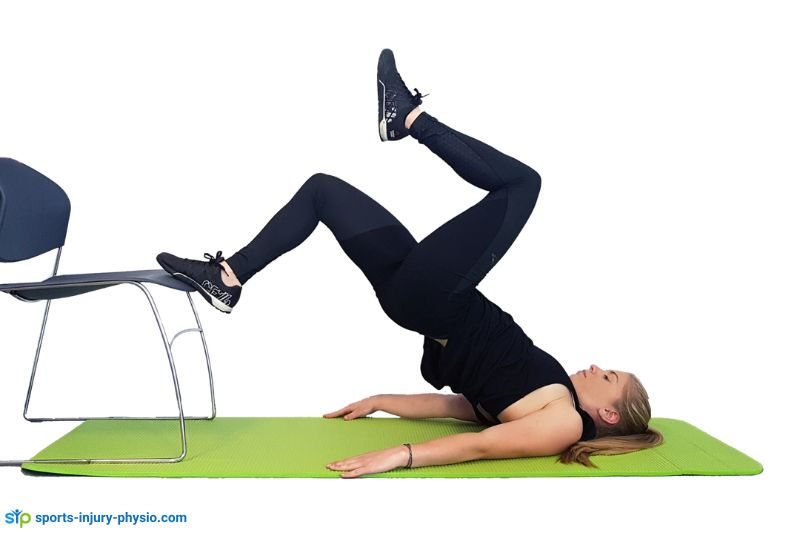
Lie on your back with one heel resting on a chair or step and the other leg bent, pulled in towards your stomach, foot off the floor.
Make sure your bottom is close to the chair or step, so you get about a 90-degree angle at the knee of the chair or step leg.
Engage your core muscles and keep them switched on throughout the exercise.
Lift your bottom off the floor so your body forms a straight line.
Make sure your pelvis stays level.
Lower your bottom back down.
Continue counting your reps until you get tired, and your form starts to slip.
Rest for at least 1 minute, then test the other leg.
👉 By placing your foot on a chair, you force your hamstrings to do their fair share of the work. If you find this position bothers your neck, you can do it with your foot on the floor instead – just move it further away from your bottom so your leg is in a straighter position (roughly a 45-degree knee angle).
How to interpret your results
As before, a small difference between sides is normal, but it shouldn't be more than one or two repetitions.
Fewer than 10 repetitions – needs work
More than 15 – fair
More than 20 – good ✅
If you notice:
Your trunk keeps twisting – you probably need to work on your back and core strength as well.
Your hamstrings keep wanting to cramp – they might not be strong enough for this position yet. In that case, start with easier bridge variations, like double-leg holds or single-leg bridges with your feet on the floor.
How to improve it
If you had good control but lacked endurance, you can use this test movement as part of your regular workouts. To add some variety, throw in other exercises like weighted deadlifts, reverse mountain climbers, or leg curls.
If you struggled to control the position, starting with double-leg bridges (with added weight or straighter knees) can be a great way to build up. Weighted deadlifts are also a fantastic option.
Again, these all fall under strength training, so it's usually best to leave at least 2 days for recovery between sessions.

How we can help
Need help with an injury? You’re welcome to consult one of the team at SIP online via video call for an assessment of your injury and a tailored treatment plan.

We're all UK Chartered Physiotherapists with Master’s Degrees related to Sports & Exercise Medicine or at least 10 years' experience in the field. But at Sports Injury Physio we don't just value qualifications; all of us also have a wealth of experience working with athletes across a broad variety of sports, ranging from recreationally active people to professional athletes. You can meet the team here.


About the Author
Maryke Louw is a chartered physiotherapist with more than 20 years' experience and a Master’s Degree in Sports Injury Management. Follow her on LinkedIn and ResearchGate.


